
David Fokos on “Book Pages Project”, Inspiration & Photo Tips
David Fokos has been a photographer for 40 years, mastering and strengthening his uniquely minimalist artworks. Fokos speaks with Sparks Gallery about his solo photography show, “Book Pages Project” and delves into the creative and technical process behind his work.
Sparks Gallery asks: How has your background influenced your creative process? How has your work developed?
Fokos: With regard to my minimalist, black and white landscape work: My parents live on Martha’s Vineyard island, and I have been photographing there for nearly 40 years, making my relationship with the Island the most enduring connection I’ve ever had with a specific place.
There is a peaceful, rejuvenating natural beauty there that remains largely unspoiled. It is the inner peace and calm that I experience there that I have tried to express through my work.
During the first 15 years I was photographing with a view camera, I photographed exclusively on the island, struggling to make images that expressed what I felt. Eventually my own style began to emerge as I drew upon my technical background in science and engineering, and my decades-long interest in Japanese aesthetics to develop a personal theory of how we perceive the world and a method for expressing that through my art.
With regard to my Book Pages Project: I feel that my austere book page compositions were informed by my longtime interest in Japanese aesthetics. Additionally, the Japanese concepts of wabi (rustic simplicity, freshness, quietness, an appreciation of imperfection), and sabi (patina and an appreciation of the ephemeral nature of things) speak directly to my love of the texture and patina of these old books. My background in engineering was helpful in conceiving and executing the imaging process I used for this work.
Sparks: What artists or artworks have left a lasting impression on your work?
Fokos: For my Book Pages Project, I think I have been most inspired by the photographs of books I saw years ago by Abelardo Morell. The technique I used to image these pages was inspired by the exquisite botanical images created by Katinka Matson.
As for my black and white landscape work, that I initially developed on my own, but it was later further inspired by the photography and philosophy of David Hockney, and the Shinto-inspired work of Hiroshi Sugimoto.
Sparks: What book has inspired you the most? And for the “Book Project Series”?
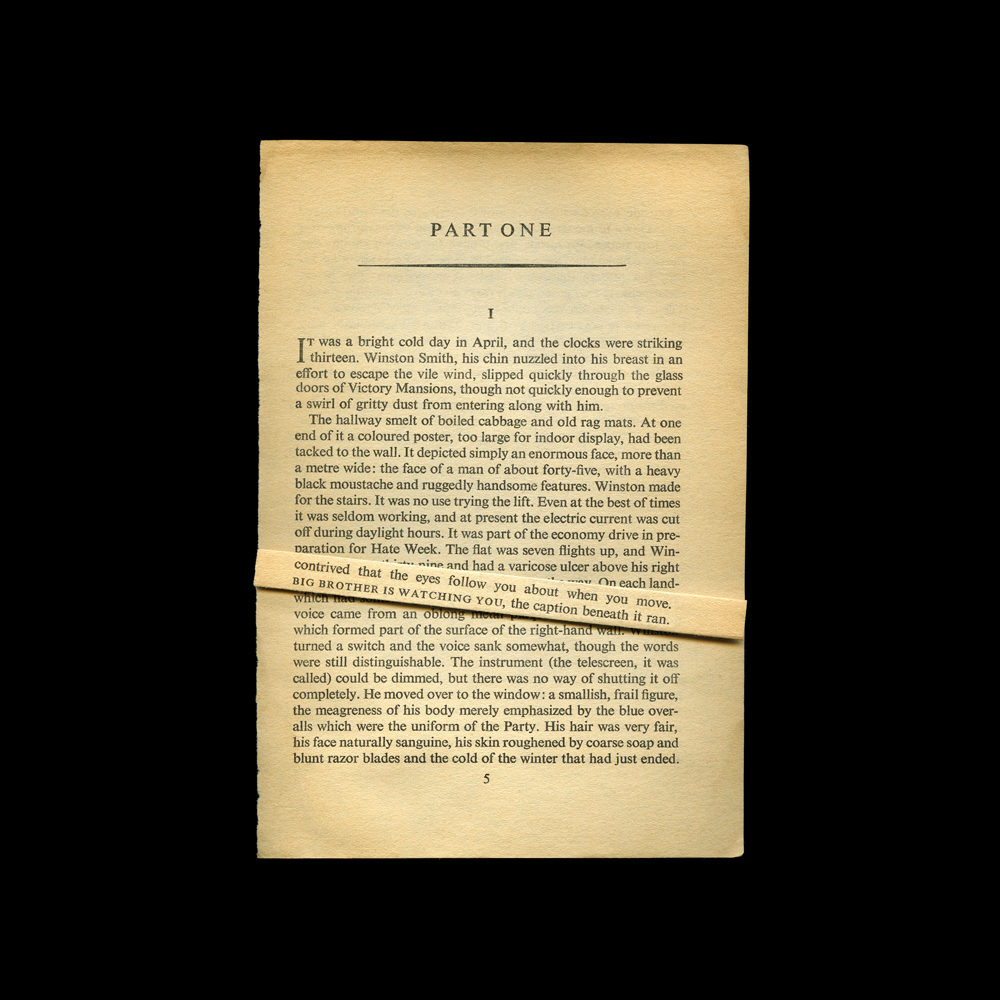 Fokos: I don’t think I could name a single book that has inspired me the most. However, for the Book Pages Project, George Orwell’s Nineteen Eighty-Four was a rich font of material. I feel Orwell’s vision of a dystopian surveillance society is especially relevant to today’s world.
Sparks: What type of response do you hope to evoke from the viewer with this exhibit?
Fokos: Aside from being a love letter of sorts to physical books, my intention with the Book Pages Project is for the viewer to reflect upon and appreciate the profound contribution writers have made to our culture through their art. If people leave thinking, “Huh. I’ve never really thought about where those words came from,” then I will have succeeded.
Sparks: Umberto Eco stated, “Books are not meant to be believed, but to be subjected to inquiry. When we consider a book, we mustn’t ask ourselves what it says but what it means…” How are you highlighting the subjectivity for the books/quotes you have chosen to photograph?
Fokos: My manipulation of each book page is my subjective response to the work of the author. The viewer of my work then subjectively interprets my interpretation. So the viewer is two steps removed from the full text of the book.
And while I highly recommend that people seek out and read these books, this project is more about words and phrases that have gone on to have a life of their own, removed from the body of the original work.
Sparks: What type of camera did you use for the “Book Project series”?
Fokos: I photographed my book pages using the camera inside my flat bed scanner.
Specifically, my process goes something like this…
First, I come up with a word or phrase I think could make a good subject for one of my images. I then research the word to find it’s origin. After that, I try to conceive of a way to manipulate the book page to subtly (or not so subtly) reference the word or phrase. Once I have my concept, I purchase the book in which the word originated. I try to use first editions whenever possible, but sometimes the layout of the text is such that it doesn’t work with my concept for the manipulation, in which case I try other editions. Sometimes, I’ll go through three or four different editions of a book before I find one that works.
 The last step before imaging the page is to accomplish the planned manipulation. Sometimes this involves hours of research and practice, as with my Fashionista image, for example. I first had to research how to make an origami dress. Then I had to practice this until I understood the final result completely, meaning that I knew exactly which part of the page I needed to use, where I needed to make my folds to highlight the word Fashionista in just the right place, and how I could avoid certain folds I didn’t want to see in the final image. Finally, I had to modify the original marmish origami dress pattern to create something sexier and more appropriate to the world of high fashion.
Once everything is perfect, I work on photographing the page. I strategically place the page on top of my flatbed scanner, remove the scanner lid, and turn out the lights in my studio. I then scan the page at an extremely high resolution. The black background you see in my images, behind the book pages, is just the darkness of my studio. Sometimes, it takes a while to get the image just right. I’ll use bits of tape, a small weight placed inside a piece, or a bit of string hanging from the ceiling to hold part of a page further away from the scanner bed to get just the right form and to hold the page in place.
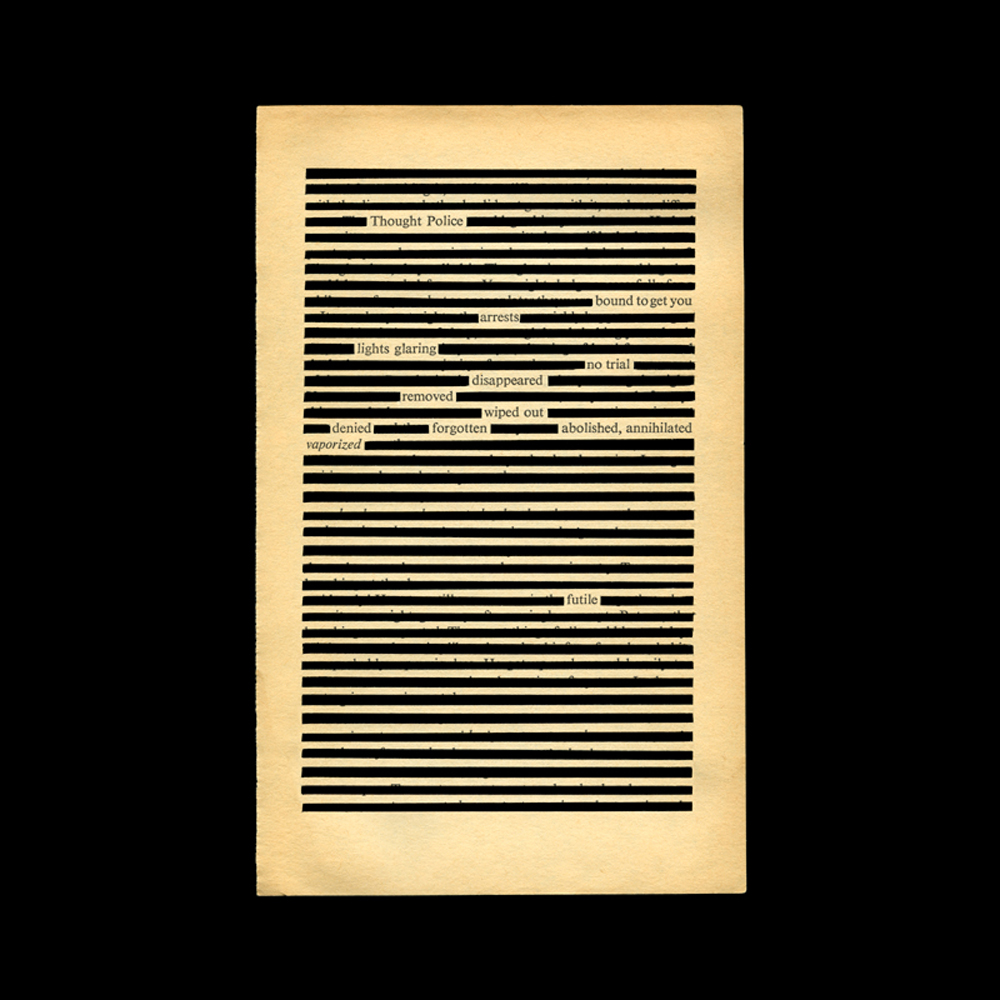 For my Thought Police image, I balanced paneling nails on their heads on the back side of each word you see in the image. Since I had cut away so much of the page with an X-Acto knife, the paper had a tendency to ripple and curl. The nails provided just enough weight to hold the paper flat against the bed, and because the image was made straight up from the other side, the nails were hidden from view. Of course, like setting up a long line of dominos to be knocked over, it took many tries and a lot of patience to finally get all the nails standing at once.
I also experiment a lot with the orientation of the page on the scanner bed. Turned one way and the shadow behind the folded section of my Big Brother image falls at the bottom edge of the fold — turned another way, it is along the top edge.
There are two main reasons I chose to use the scanner to create these images. First, the extremely high resolution of this process — many hundreds of megapixels, a resolution that far exceeds what is achievable with regular cameras — really allows me to highlight the fibers and texture of the paper. It is this texture and the nature of the ink on the page that is one of the main differences between printed books and e-books. Second, is the quality of the light. It would be nearly impossible, if not entirely impossible, to light the pages in the same way using conventional studio lighting. 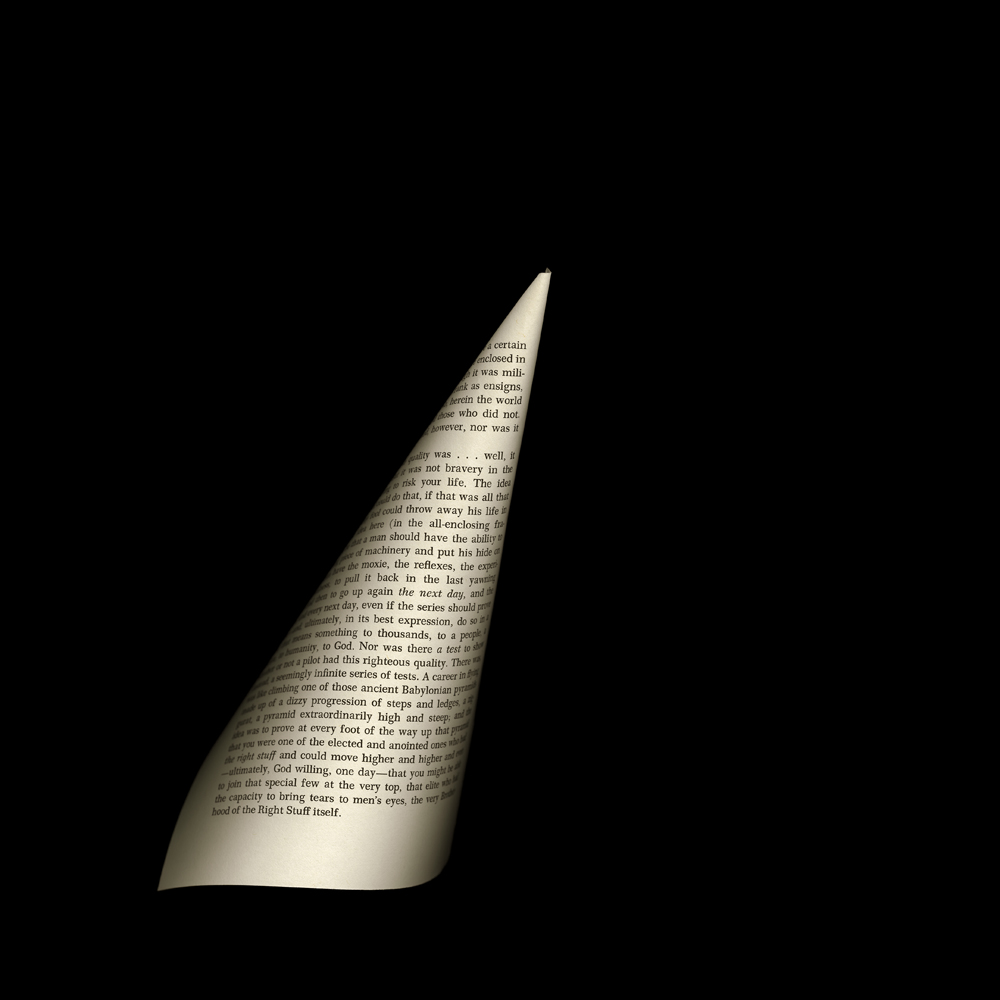 For example, if you look at my image, The Right Stuff, you’ll notice that the light follows the diagonal of the cone while falling off to either side. To try to form a beam from a studio light into that exact shape would be nearly impossible, yet it is precisely the light I required for my image.
Sparks: Do you think that technology will eventually obliterate the printed book?
Fokos: Regrettably, yes. E-books, of whatever form, are so much more cost effective to manufacture and distribute than printed books. The convenience of an e-book is undeniable, and there will soon be generations that grow up never having experienced a physical book. Perhaps there will come a time when artists and/or hipsters of the future embrace the old retro technology of the printed book and bring it back on a limited scale.
Sparks: How do you see photography progressing/evolving?
Fokos: It’s been a fascinating and exciting time in the evolution of photography. There was a time, not so long ago, when the art world was rebelling against “digital” photography. Now, of course, it’s rare to find anyone still using film. I always thought the whole debate was absurd. Cameras are just tools, whether they record to a piece of film or an image file.
One argument I often heard in favor of shooting film was that it slows you down. That’s true, it does. When you have a roll of 24 frames of 35mm film, or maybe just 12 sheets of 8×10 film to use before you have to reload AND each frame you shoot costs you money (about $9 per sheet in the case of B&W 8×10 film and $18 per 8×10 sheet for color!) then that really does have a limiting effect on how many frames you shoot. Therefore, it is conceivable that you would take more care with each frame rather than casually shooting thousands of frames and hoping that sort of shotgun approach yields something worthwhile. But that’s a fallacy. You can still go out with a digital camera and shoot just 12 well-considered photos. It’s a matter of personal discipline, only now you have to force yourself to slow down rather than have the pace imposed upon you by some limitation inherent in the technology.
It would be a huge understatement to say that today we see people taking many more photos. With high-quality cameras built in to our smartphones, it seems we all have a camera with us all day, every day. Each of us probably takes hundreds, if not thousands of photos each year. Could you imagine, say 20 years ago, if everyone walked around with a 35mm camera hanging from their necks, clicking away, photographing their hamburgers?
I have very, very few photos from when I was in high school, and even fewer from my time in college. Today, thanks to the advances in camera tech and the rise of the internet and social media, most everyone (especially the most recent generations) have tens of thousands of photos documenting nearly every moment of their lives.
This has a couple of profound implications for photographic artists. It’s interesting to think there was a time when photography was not accepted as art. That battle was finally won. Now, in a time when everyone has become a photographer, photographic art has in some ways been downgraded again. Not everyone can paint or sculpt, but everyone can push a button, or so the thinking goes. Though the average person may not know it, creating good photographic art is so much more than just pushing a button and adding an Instagram filter.
Another implication is that we have all now seen so many photographs that it has become increasingly difficult to make an original image. And, as I mentioned above, I think it is essential that the photographic artist show us something we haven’t seen before.
As time progresses, we will continue to see advances in technology that allow for higher quality photos from smaller and smaller cameras.
Post processing technologies, from filters to fine adjustments will only improve, become more widespread and easier to use. To think that the use of Photoshop as a post-processing tool was once scorned, and now there is hardly a photo out there that is not in some way post-processed.
Technologies now exist that allow you to take a photo and then later decide what part of the image you want in focus.
We will see more and more video and holography, both for casual personal use as well as in art.
Our daily obsession with documenting even the most mundane moments of our lives and sharing them with the world is sure to have some profound, though as yet unforeseeable implications.
And the biggest implication of all is that we will abandon our privacy.
Sparks: What advice would you give to aspiring photographers?
Fokos:
- Simplify your photo making process.
Photography is not about the equipment, so anything you can do to minimize the amount of time you spend thinking about it and fiddling with it, the better. For example, I use only one lens. If I had more than one lens I would have to stop to choose which one to use — I would be thinking about the equipment. When you have too many choices it’s possible to be paralyzed by indecision. Ironically, giving up choice actually gives me more freedom.
The 8×10 camera I use is a “drop bed” style that is older and more rickety than modern view cameras, but I can set it up in 10 seconds. I hate having to fiddle with all the knobs — folding this down, raising this up, loosening this, and tightening that, etc. I don’t want to be distracted from why I wanted to make the picture.
- Again, getting back to the paradoxical relationship between choice and freedom, I would recommend imposing some limitation on yourself. At one time, I told myself that I was only going to photograph scenes with water in them (though I have since moved beyond this). While this may seem limiting, it was, in fact, liberating. There are good images to be made everywhere, so, in essence, by limiting myself I gave myself permission to pass by many of those good photo opportunities without guilt. This made me focus my work on one subject and explore it in more depth. Which brings me to my next point….
- Choose one subject and explore it deeply. I photographed the water for 15 years before I finally began to make images that I think successfully represented how I felt.
- Don’t worry about trends. A lot of photographers, especially art students, get caught up in the whole “I’ve got to be hip and edgy, so I think I’ll make these pictures as shocking as I can.” I think that’s just an excuse from photographers who are insecure about their work.
Don’t get me wrong. If an artist has a valid reason for making shocking pictures, that’s fine, but don’t do without a good reason. Likewise, there is nothing wrong with “pretty” pictures. The main point is to know why you are making your photographs.
- Show me something I haven’t seen before. You should be asking yourself this question every time you make a photograph: “Is this something I haven’t seen before?” I could go out and take pictures like Ansel Adams, but what’s the point? It doesn’t show me anything new about the world that I haven’t already seen.
- Don’t use gimmicks. Printing so I can see the edges of the negative, using a Holga, distressing the image, selective focus, or anything when done for any reason other than it somehow serves the image and helps to better communicate your message to the viewer more clearly should be avoided. This is just a crutch used by insecure photographers who don’t think their images are strong enough to stand on their own merit. I’m not suggesting that these are inherently bad techniques, or that they should be avoided, only that you shouldn’t do it unless you have a valid reason.
- Use whatever tools are available to make your image stronger. Being an artist is about using some media, in this case photography, to communicate some thought, idea or emotion. So long as you are not a documentary photographer, you should do anything you can to strengthen your image. This means cropping, masking, using Photoshop, making platinum prints, adding other materials — Plexiglas, metal, paint, whatever — these are all just tools. Whatever it is, if it makes your art better communicate your message, use it and don’t be an apologist.
- Be your harshest critic. Edit your work ruthlessly. Show nothing but your best. Others will judge you only by what you show, not what is stashed away in your boxes of negatives and on your computer hard drives.
- Present your work professionally, and consistently. A body of work should look like a coherent body of work. All the images should explore a theme and be presented in a similar (and professional) manner. Unless there is some compelling reason, do not mix black and white with color photos. Do not have landscapes, portraits, still-lifes, and abstracts all together.
- Don’t get overly attached to your process. For 15 years all my prints were platinum prints. I invested many years of research and work perfecting my process. Then one day, I realized that my images would look better on modern materials, so I switched. It wasn’t easy, but it was necessary. I had to ask myself if I wanted to be a platinum printer or an artist. Everything about your process must serve the image.
Sparks: Describe the technical process of using a view camera and your editing phase.
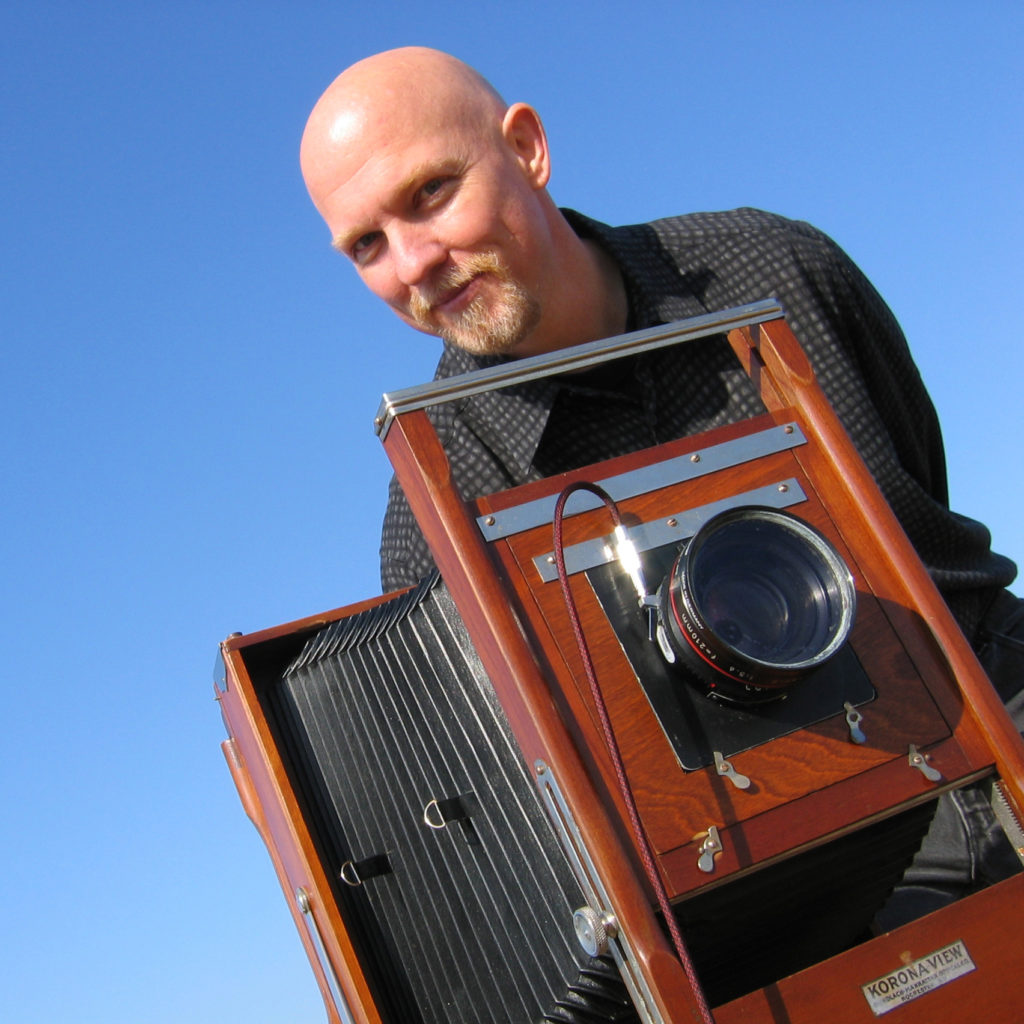
Fokos: First I pack up 60lbs. of equipment into a shipping container and send it ahead of me to my destination. My equipment consists of a large backpack which holds my 86-year old, wooden, 8×10 Korona View camera, a 210mm Rodenstock Sironar-S lens, 6 film holders (each carrying 2 sheets of film), and my tripod.
Once I have a scene I want to capture, I set up my tripod, pull the 8×10 camera from my backpack and mount it on the tripod. To compose the image, I open up the lens, throw a dark cloth over the back of the camera and my head, and then view the projected scene, upside down and backwards on the ground glass.
A view camera is nothing more than an empty box with a lens on one end, and a piece of ground glass (like frosted glass) on the other. The lens flips the scene upside down and backwards and projects it onto the glass and I view it as if I was looking at a television, except that the image is not very bright, hence the need to hide under a dark towel so that I can better view the dim image on the glass.
Once I am satisfied with the composition, I check the focus by viewing the image on the ground glass with a loupe; I choose what filters I want to put on the lens (if any), make my exposure calculations, choose aperture and exposure time, close the shutter so no light is getting into the camera, arm the shutter so that it’s ready to take a picture, and then load a sheet of film into the camera.
Sheets of film are kept in film holders. Each flat holder (about the size of a laptop computer) holds 2 sheets of film — one on either side. Before setting out I would have loaded all my film holders with fresh sheets of film. This must be done in complete darkness. I typically do this in a “changing tent,” which is a miniature pop-up tent that I can put my box of film, scissors for opening the film packs, and film holders inside. The tent gets sealed up but I can access the inside by slipping my arms into two sleeves that extend into the tent, sort of like they do in a lab when handling radioactive material. Without being able to see, I have to open the box of film, remove a foil pack of ten sheets, cut the pack open with the scissors, and then one by one, remove a single sheet of film, find an empty film holder, orient the film holder correctly, orient the film correctly (and right side out), slide the sheet of film into a metal tray inside the holder without damaging it or getting my fingerprints all over it (the tray’s edges are folded over slightly to hold the film in place — imagine how the rack is held in place inside your oven), and then finally insert a “dark slide” into the film holder to seal the film in darkness. The dark slide is just a thin piece of plastic that slides in and covers the film tray so that it does not get exposed to the light when I remove it from the tent. By feeling bumps along the edge, I can tell which side of the dark slide faces out. This is so I will know which holders carry unexposed film and which ones have already been exposed (more on this in a bit.) Once all the film holders have been loaded, and all the other film packed up in a light tight box, I can finally open the tent.
To make an exposure, I take one of the film holders with unexposed film. There is a strip at the edge of the dark slides. On one side of the dark slide it’s white, and on the other side it’s black. When I loaded the film in the tent I made sure to have the white side showing to indicate that the film inside was unexposed. Now, with my camera all set up, I pull the wooden frame with the ground glass backward, away from the camera. It is attached by a spring-type mechanism that allows me to do this, opening up a gap at the side between the ground glass and the body of the camera. I slide one of the film holders into this gap, and all the way across the back of the camera. The spring tension of the ground glass frame holds the film holder in place. It’s now sort of a sandwich — frame with ground glass, film holder, and the body of the camera.
The way the camera was designed, a sheet of film, still protected from light by its dark slide, now sits EXACTLY where the ground glass on which I focused my image was.
All that remains is to make the exposure. With the shutter in the lens closed, I pull out the dark slide protecting the film. The film now sits inside a completely dark box ready to receive light. I trigger the shutter and the lens opens up for however long I want my exposure to be. At the end of the exposure the shutter closes and the now exposed film sits in the dark again. I then reinsert the dark slide to again protect the film from light but this time I flip it over so that the black strip indicating that the film inside has been exposed will be on the outside. I then pull back on the spring-mounted ground glass frame and remove the film holder. I’ve now taken a picture. Of course, I won’t know if it’s any good until I get home and develop the sheet of film.
At the end of my trip, I pack all my equipment back into its shipping container and send it home. Once I’m back at my studio, I have to develop the film I shot on my trip. I set up my changing tent again, put all my film holders, now containing exposed film, inside the tent along with a large plastic cylinder called a daylight tank for developing film. Inside the tent, in complete darkness, my hands open up each film holder, remove the sheet of film, and then carefully load it into a special compartment inside the daylight tank. The tank can hold 5 sheets of film at a time. Once I’ve loaded 5 sheets, I put the cap on the end of the tank to keep light from getting inside. I remove the tank, now containing the 5 sheets of film from the tent, and set it up for processing. I mix up my photo chemicals — pre-soak, developer, stop bath, fixer, clearing bath, wash, photo-flo. About an hour later, after going through the sequence of chemicals, my negatives are now developed. I hang them to dry from clothespins.
Now, finally I can see if I made any good images. I evaluate my negatives on a light table and then if I find one I like I scan it. To scan my negs, I wet-mount the film to my Epson V750 Pro scanner (to wet mount I put a thin layer of scanning fluid on the scanner bed, lay my negative on top of it squeezing out any air bubbles, squirt more fluid on top of the negative and then cover that with a sheet of mylar, and again squeeze out the bubbles). I then scan the film at a very high resolution (16-bits @ 2400 ppi). This results in an 800MB grayscale image file (which is equivalent to the resolution of a 2.4GB color file).
After I have the high-resolution image file in my computer, the real work begins. I often spend 100 hours or more, fine-tuning the image — dodging and burning (making certain areas lighter or darker), adjusting local contrast, etc. This is the part of the process that adds the emotion back into the image my camera recorded.
Once I’m satisfied with an image, I make a series of test prints, and image adjustments, and then, finally, make a finished print on my Epson 11880 printer.
Now that I have a finished print, there still remains one thing to do and that is to have the print framed for presentation. The frame plays a significant role in the finished work and its importance should not be taken lightly. The style and weight of the frame becomes a part of the composition. Over the years I have tried a number of different styles of framing until I found one that I think is ideal.
For my black and white images, I send my prints to Los Angeles to be framed by one of only two framers in the country that I feel is capable of the quality of framing I require.
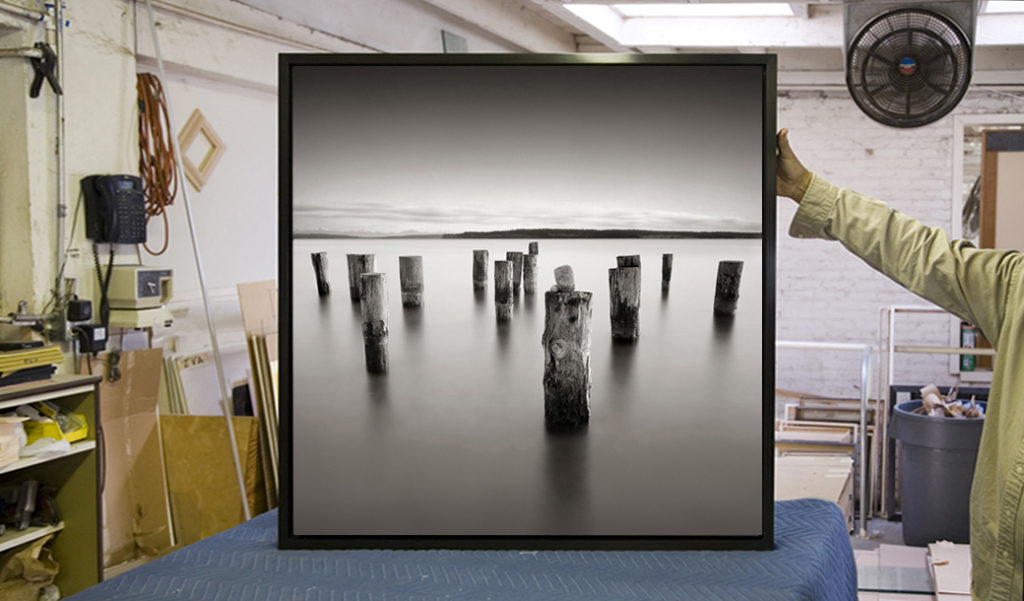 My prints are “face-mounted.” This is a special process that was developed in Germany whereby the print is bonded to a special, premium-quality brand of UV protected, anti-reflective plexiglas, (note: before mounting, the edges of the plexiglas are polished for a finer finish) The print is then bonded using an optically-clear sheet of adhesive.
The process requires passing the print and plexi through a special machine with heated rollers, multiple times, with rest periods. The result is an amazing immediacy as, unlike traditional framing, the print sits just 1/8” from the front surface.
Next, a piece of 6mm thick black sintra (a type of rigid plastic) is bonded to the back of the print. At this point, the print is hermetically sealed between these two sheets of plastic. A wood frame is then bonded to the sintra.
Next, a decorative outer wooden frame is custom-milled by my framer from rock maple, to which he applies 3 coats of a proprietary color of lacquer. Though my frames may look black, they are not. I worked with my framer to develop a special “off-black” hue that would not contrast too starkly with the image. This is yet another way I work to minimize even the smallest of distractions.
Finally, with screws passing through the back side of the decorative frame and into the wooden frame bonded to the sintra, the print is made to “float” within the decorative frame with a small gap between the edge of the print and the frame.
A French Cleat system is used to hang the print on the wall so that the frame sits flush against the wall.
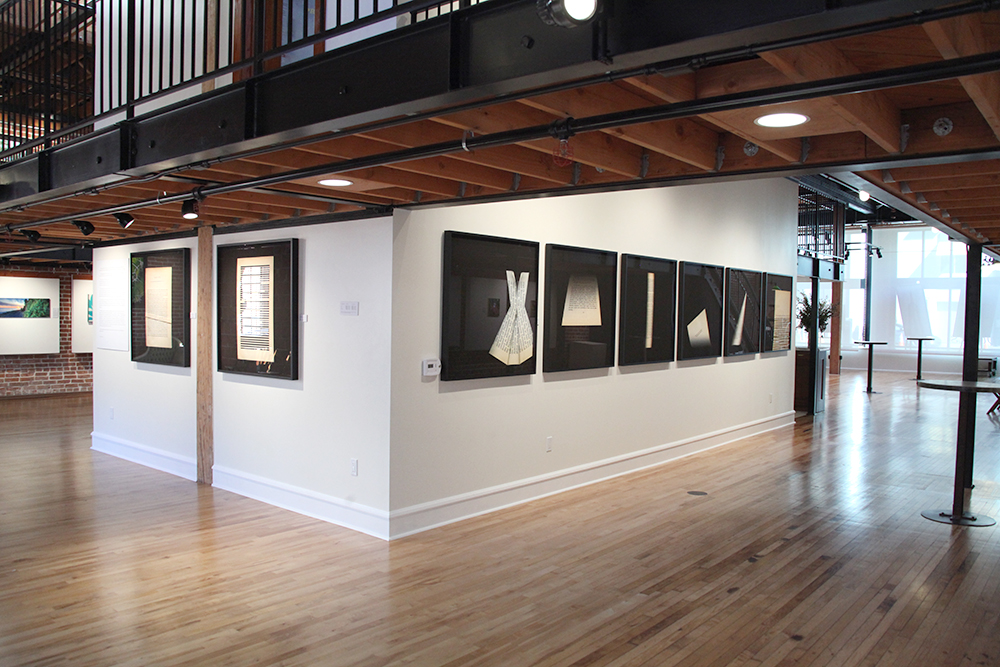
For my Book Pages, I have chosen to frame them in a 2-inch deep black shadow box style frame with anti-reflective Museum Glass.
Sparks: Do you prefer black and white photography or color? Why?
Fokos: I do have a fondness for B&W images, but I also like color. Each has its use. Color is a very powerful element in an image. It lends a sense of reality to an image whereas B&W is more abstracted. With my landscape work, the emotions I try to evoke are not rooted in color but rather in line, light, form, and graphic compositions that I think would be less effective rendered in color.
Though you might think of the pages of a book as essentially black and white, they are not. For my Book Pages Project I purposefully selected pages with golden-colored, aging paper to evoke feelings of nostalgia, coziness, and warmth that specifically contrast with the modern coldness of e-books. So this series would not have worked nearly as well in B&W.
Sparks: Do you collect artworks?
Fokos: Yes! I surround myself with the work of other artists. My wife, Barbarella, and I love living with original art. Some whimsical, some lyrical, others mysterious and thought-provoking. It is especially enjoyable for me to consider the hands of the artists as they crafted these wonderful works that I now have the privilege to live with.
Sparks: What would you consider to be your most poignant work?
Fokos: For me, the most poignant image from my Book Pages Project would have to be Thought Police from George Orwell’s book Nineteen Eighty-Four.
From Wikipedia: “Orwell’s Thought Police are charged with uncovering and punishing “thoughtcrime” and thought-criminals. They use psychological methods and omnipresent surveillance (such as telescreens) to search, find, monitor, and arrest members of society who could potentially challenge authority and the status quo—even if only by thought—hence the name Thought Police. They use terror and torture to achieve their ends.”
So, for my Thought Police image, at the top of the page, at the top of the hierarchy, you have the Thought Police. I then redacted lines by cutting them out with an X-acto blade. What’s left are a whole bunch of serifs, which are like oppressed voices trying to be heard, but they’ve been muffled. Then there is a block of words I left in the middle, all relating to the terror inflicted and the techniques employed by the Thought Police — “arrests, bound to get you, lights glaring, no trial, disappeared, removed, wiped out, denied, forgotten, abolished, annihilated, and vaporized” (in italics, no less!) Below that, is more redaction and suppressed voices until, a tiny island, sitting apart is just the single word “futile,” and after that is just silence.
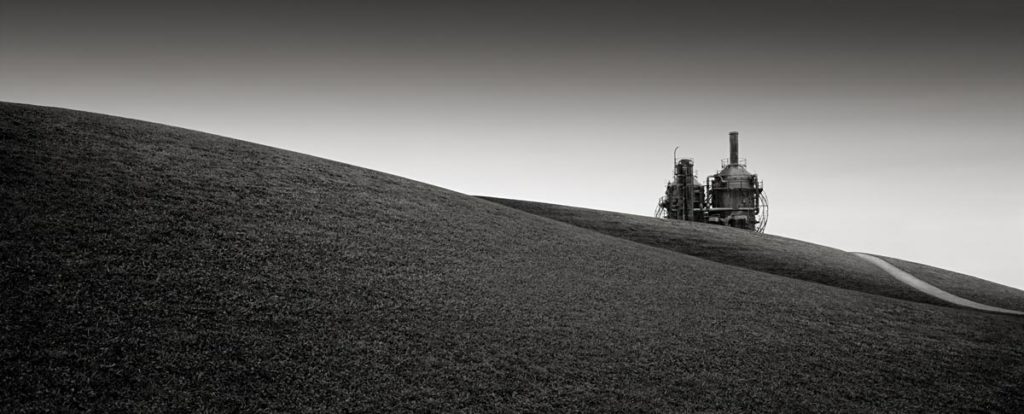 From my black and white landscape work, it would be hard to select one image – maybe my Gasworks image. It is a panoramic image dominated by bucolic, sensual rolling grass-covered hills with an old gas conversion factory (in the early 1900’s it was used to convert coal to natural gas) poking up behind one of the hills. Depending upon the viewer’s frame of mind this work can be either hopeful (Nature triumphs!) or menacing (Industry on the march to destroy the world!) There’s a path leading over the hill toward the factory. Do you want to venture down the path to explore, or do you feel like running away?
 Oh, I just thought of another… my Scenic View image. This panoramic image is of a solitary coin view (those binocular things set up for tourists at scenic places) at the far side of an empty parking lot. There is a low concrete wall on the other side of the coin view that prohibits the viewer (of my image) to see what scenic marvel lies beyond. You know it must be good for them to have installed a parking lot and a coin view, but alas, it remains forever enigmatic.
Sparks: What other themes have you done in the past?
Fokos: My black and white landscape work has been my main body of work. I’ve been working on that series for nearly 40 years and continue to add work to that portfolio.
The Book Pages Project is a more recent series.
I also use my phone to take pictures of my hamburgers.